OpenBSD Workstation Notes
I first posted my notes on using OpenBSD as my workstation in of 2013, but I probably switched from Arch Linux in 2005. This is a collection of customizations I have used for over the years, as well as some hints for using some more modern features.
Terminal
By default, some terminals render text with a heavier weight than I would like. To solve this select a font with a light or book variation. Here is my invocation for the simple terminal
st -f 'Hermit:light:pixelsize=14:antialias=true:autohint=true'
My st port includes
- The solarized color scheme
-
A modification to render
boldfonts with the weightnormal
The really compelling feature of
st
is that it automatically substitutes glyphs from the default font if the
selected font does not contain them. This enables me to use the excellent
Hermit font
while retaining the extended character set of DejaVu Sans Mono.
Also set a language to enable full Unicode support
LC_CTYPE=en_US.UTF-8
export LC_CTYPE
Resource Limits
The default process limits on OpenBSD are not nearly generous enough to run
applications such as Gimp or Chromium.
Be sure to raise the limits for memory by modifying
/etc/login.conf
staff:\
    :datasize-cur=16384M:\
    :openfiles=16384:\
Terminate the X session with
Ctrl+Alt+Backspace
to ensure settings have taken effect.
Suspend & Resume
zzz
and
ZZZ
are shortcuts for suspend and hibernate if
apmd(8)
is running. A threshold can also be set to automatically hibernating. This
addition to
rc.conf.local
reacts to a battery level of 8% or less
apmd_flags="-Z 8"
X Session Configuration
Most minimal window managers that can be customized. I run a loop in the background that read the available battery life (Wh) and updates the window manager's display area. Any sensor data can be included in such output
#!/bin/sh

. /home/eradman/.profile

xsetroot -solid gray40
xidle -ne -delay 1 -timeout 7200 -program /usr/local/bin/slock &
/home/eradman/local/bin/edit-server.pl &

while :
do
    resolv=$(awk '/^nameserver/ { printf "◢ %s %s ", $2, $5 }' /etc/resolv.conf)
    fan=$(sysctl -n hw.sensors.acpithinkpad0.fan0)
    batt=$(sysctl -n hw.sensors | awk '/remaining capacity/ { printf "%s %s ", $1, $2 }')

    xsetroot -name "$resolv | $fan | $batt"
    sleep 60
done &

exec dwm
Next set the background color and start the window manager
# .xsession
xsetroot -solid gray40
exec dwm
X Scaling
If the x display manager is to run on startup, the initial X display DPI at
startup by modifying
/etc/X11/xenodm/Xservers
# Xservers
:0 local /usr/X11R6/bin/X :0 vt05 -dpi 144
Or set the DPI in
.Xdefaults
Xft.dpi: 144
Switch to an External Monitor
OpenBSD does not have a native mechanism for running a script when a display is connected, but we can use a small script to adjust the display
 xrandr --output DP-1 --auto --primary
 xrandr --output eDP-1 --off
 xrandr --output HDMI-1 --off
Where
eDP-1
is the LCD pannel on my laptop.
tmux
There's only a few tweaks I make to my terminal multiplexor's configuration. I frequently run entr in a smaller pane on the bottom
bind-key C-t split-window -p 25
I don't know of a terminal color picker, but they can be printed with a shell loop.
for i in `jot 255`; do
    printf "\033[38;5;${i}mcolour${i}\n"
done

printf "\033[0m"  # reset
Features such as the status bar colors can be set using these names
set -g status-bg colour118
set -g pane-active-border-fg colour118
set -g pane-border-fg colour30
Home Directory Encryption
Create a softraid device for a partition with the type
RAID
bioctl -c C -l e071c4a12e66a7eb.j softraid0
Create a disklabel on the encrypted volume
disklabel -E sd2
Initialize a new file system
newfs /dev/rsd2a
By using this
dislabel unique identifier
instead of a device letter
mount
will be sure to find the correct device.
A loop in
rc.securelevel
can be used to mount encrypted device
for attept in 1 2 3 4; do
    bioctl -c C -l e071c4a12e66a7eb.j softraid0 && break
done
fsck -y 12bfecb8793bda19.a
mount -o nodev,nosuid,wxallowed 12bfecb8793bda19.a /home
The
wxallowed
mount option is required for interpreters such as run Python from a
virtualenv
in a home directory.
Screen Lock
# .xsession
xidle -ne -delay 1 -timeout 7200 -program /usr/local/bin/slock &
To trigger this action when the system is suspended, create
/etc/apm/suspend
with an instruction to signal
xidle
to run the lock program
#!/bin/sh
pkill -USR1 xidle
Wireless and Wired Networks
Since 6.9 dhcpleased(8) handles route updates based on DHCP offers, enabling automatic transition between wired and wireless networks
# /etc/hostname.iwm0
join radnet-guest mode 11g
join Verizon-MiFi8800L wpa wpakey **********
inet autoconf
# /etc/hostname.em0
inet autoconf
Multiple default routes may be installed in this way, but link-layer protocols use the route with the highest priority.
Setting Pointer Speed
The speed of a USB mouse (or any pointer) may be controlled with wsconsctl(8)
wsconsctl mouse2.param=0:1000,1:1000
Printing
The advent of
driverless printing
makes printer setup much easier.
# rc.conf.local
cupsd_flags=""
To add a printer
lpadmin -p MFC-L3780CDW -E -v ipp://192.168.0.12/ipp/port1 -m everywhere
Firefox
To customize Firefox, install
/usr/local/lib/firefox/browser/defaults/preferences/openbsd.js
pref("browser.startup.homepage", "about:blank");
pref("extensions.pocket.enabled", false);
pref("media.autoplay.enabled", false);
pref("network.dnsCacheExpiration", 0);
pref("network.trr.mode", 5);
pref("security.fileuri.strict_origin_policy", false);
Since the OpenBSD build of Firefox is patched to use
unveil(2),
add an entry to
/etc/firefox/unveil.content
for allowing read home directory
# access to web development files
~/www/ rwc
Video conferencing web applications such as Zoom only require some minor
setup.
As described in OpenBSD's
faq13
Enable access to universal video class devices with
chown
chown $USER /dev/video*
And switch USB microphone/headset when connected
rcctl set sndiod flags -f rsnd/0 -F rsnd/1
rcctl restart sndiod
Chromium
A
policy file can be applied for installing the file
/etc/chromium/policies/managed/openbsd.json
{
  "BackgroundModeEnabled": false,
  "NewTabPageLocation": "about:blank"
}
The OpenBSD build of Chromium is patched to use
unveil(2),
add an entry to
/etc/chromium/unveil.main
# access to web development files
~/www/ rwc
See also: Kerberos and OpenBSD
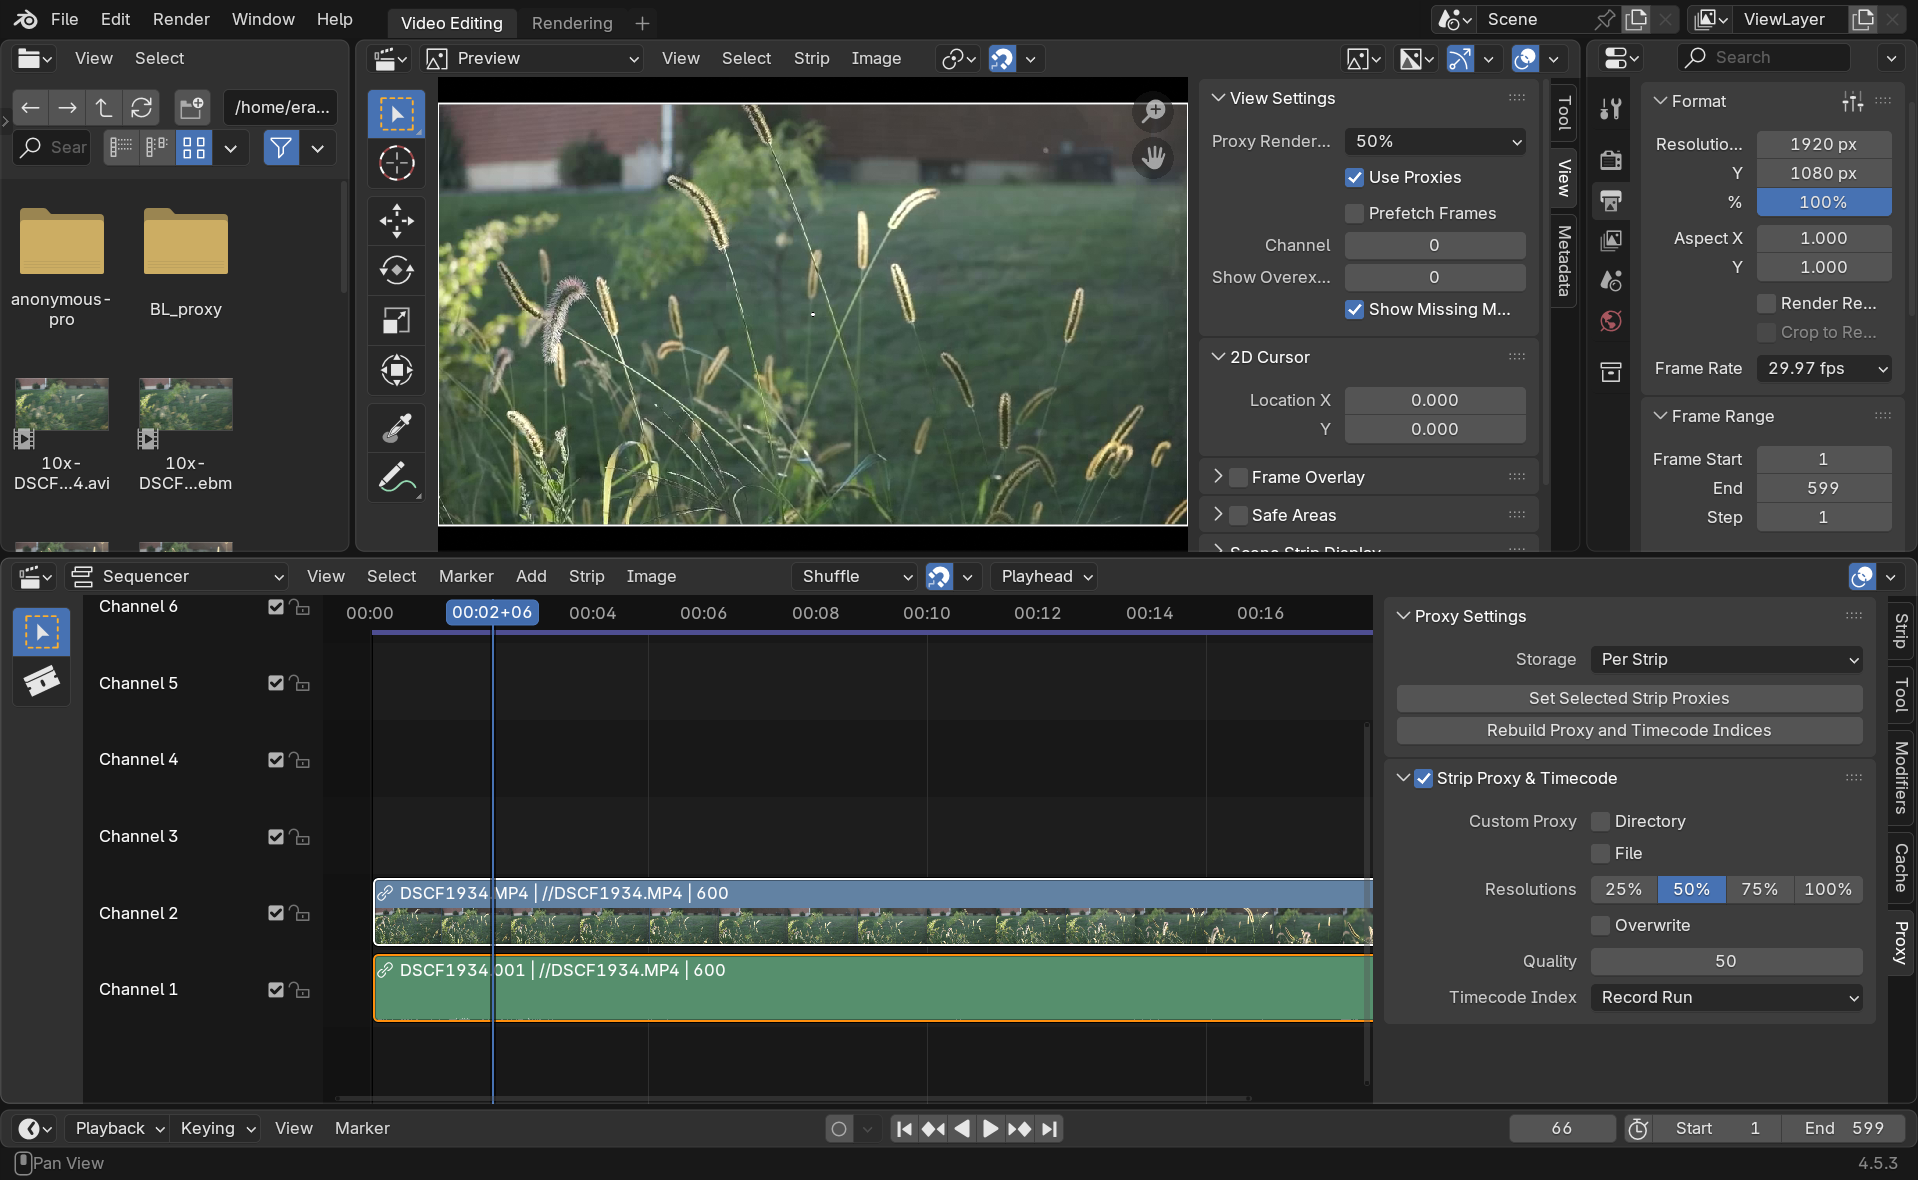
Blender
First set the Audio Device to OpenAL under Preferences→System→Sound.
By default a proxy is generated when a strip is first dragged onto the timeline. (Wait until it is finished before scrubbing back and forth over the video!) If Blender crashes when importing video files, set Proxy Setup to Manual under Preferences→System→Video Sequencer. For even better performance a lower resolution proxy.